Create and Sell Your Own NFT Tutorial
Page 2 - Setting up a Schema and Template
These are fields that will be filled in later, when you mint your NFT. So you will not be filling in these attributes with actual information yet. You are only creating the slots for them.
Go to NFT Creator, View Collection. Click on Create New Schema.

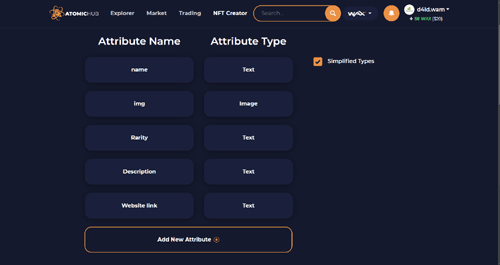
The initial page for your Schema will look like this, showing the default fields. This is what it will look like if you add a couple more.

To see how this works, Add New Attribute, name it "Rarity", and set the type to "Text".
By way of example, here is what a completed Schema looks like that includes a Description. This part is up to you. Create whatever fields you think you will need. What I have here are suggestions. You can create whatever you like.
Also, as I mentioned before, you can have more than one Schema. But for this tutorial, we just need the one.

Next, it's time to build a Template.
A Template is a way of providing a shortcut when minting new assets. The attributes that you created in your Schema appear in your template. You can pre-fill some of them. For instance, the URL that you want to plug with your NFT is going to be the same all the time. So rather than retyping it every time, you can hardwire it into a template.
Go to NFT Creator, View Collection. Click on the schema you just created. Click on Create New Template

The default template will show you all the attributes from your Schema and give you the option to fill them in.

The top part of this form shows you Max Supply This will allow you to pre-number how many assets you intend to mint. Leave this blank (more on this later). You can also set the flags for whether your asset can be transfered (sold or given away), or burned (completely destroyed). Leave both of these turned on.
For the rest of the form...
Whatever you fill in will be pre-filled when you create your assets later. They cannot be edited once they are filled in, so be careful to make sure that this information is correct.
Whatever fields you wish to be editable when you create your assets, should be left blank.

In the case of the example for this tutorial, all of the attributes will be pre-filled because I don't wish to change them. The only one that is left blank is the Image attribute. This is because I may decide later to create more NFTs than the one I created for this tutorial. They will all use this template. And I can fill in the image when I mint the asset.
I have templates for other projects that have all of this information filled in. So when I mint new assets, all I need to do is mint them using the correct template, and all the information I need is filled in. And that is the purpose of the templates. It gives you the flexibility to shortcut what would otherwise be repetative work.
One more note about the template. You will see that NFTs, once minted, are numbered. For serious collectors of NFTs, the lower the mint number the better. If you mint 2000 of an asset, the collectors will place far greater value on Mint #2 than they will on Mint #1452 or something. And that is what the "Max Supply" is for. The reason we are leaving this blank is that we don't want the maximum to be preset. We want to be able to upload more of these as they sell out.
Next up, we will finally mint an asset. You are ready for the final steps: Page 3
Last updated:


